Lab 00 - Git version control system
Git version control system
Version control system
The version/revision control system is a software for tracking changes (usually in source code) and helping programmers to combine changes made by many people at different times (https://en.wikipedia.org/wiki/Version_control). One of the popular distributed version control systems is Git created by Linus Torvalds for the development of the Linux kernel (https://en.wikipedia.org/wiki/Git).
Additional materials:
- Git website: http://git-scm.com/
- Free book: http://git-scm.com/book
- Tutorial from GitHub: https://guides.github.com/
GitHub Desktop, GitHub account
Create an account at GitHub. Remember that GitHub is a very popular service among the open-source community and choose the alias under which you will be visible on the site carefully. All content published on GitHub, including projects and code, is public by default. GitHub profile can be your business card!
Usually, the version control system is controlled with a
git program called from the command line. However, there
are a number of GUIs that make it easier to work with Git. One of them
is GitHub Desktop. Download the program from https://desktop.github.com/
and install it. If this is the first time you run the program, you will
be asked to log in with your GitHub account. Otherwise, the program will
ask you to log in later.
Remember to log out of the program after the classes are finished!
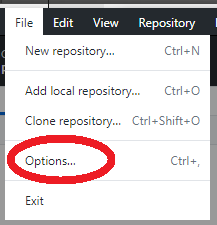
Make sure that GitHub Desktop has the user identity set properly (many people use the program in the lab). Thanks to this, the changes uploaded to the repository will be marked with your username and e-mail address. To do this, select Options… from the File menu (if the menu is not visible, you can use the Ctrl+, shortcut):

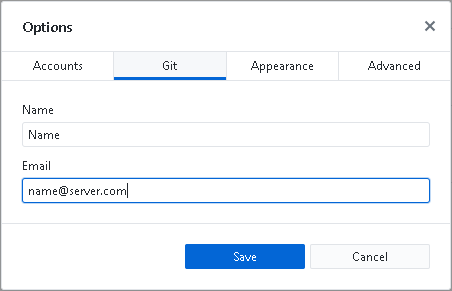
Then edit the name and email address in the Git tab:

Creating a repository
GitHub Desktop is used to manage local repositories located on your computer’s hard drive. The first step that allows us to work is to create a local repository in our project folder. To do so click:

Then name your repository: hello-git-name (don’t use “Polish” characters in the name of the repository!) and select the location where your project will be created. Select the Git Ignore configuration. It is worth to choose the language used, e.g. C++ (find out on your own what the .gitignore file is). Create a local repository by clicking Create Repository.
View the contents of the folder with the repository created. Note that a hidden .git folder has appeared. Think about what it contains.
In the upper left corner there is a drop-down list of repositories:

You can select the current repository you are working with from it. At this point our repository only exists on the local computer. You should place it on the GitHub server. To do this, click on it:

If we have not logged in to GitHub yet, we will be asked to do so.
If you don’t want the repository to be public, leave the Keep this code private checkbox checked. A free GitHub account allows you to create private repositories shared by up to 3 users. We confirm our willingness to publish the repository and wait for the data to be sent to the server.
Go to your GitHub profile and view the repository you created.
Initial commit
Let’s make sense of our first repository! In the hello-git-name project folder created directly, create a sample program design using SFML and OpenGL, as instructed by laboratory 07.
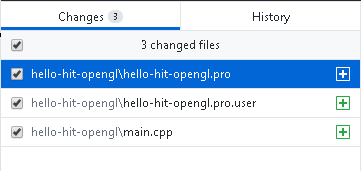
Return to GitHub Desktop. Note that the program has automatically detected changes in the files. A list of modified files and the content of the modifications is displayed. Changes should include 3 files: main.cpp, .pro and .pro.user:

Time to send changes to the GitHub service. In order to do so, in the “Summary” field, put a description of the changes made, every time you make a new change, you should put a short comment on the work done in the code. Make a commit of changes using the button:

At this point, we have informed the local repository of the changes we have made, but they still need to be sent to the server (push). To do so, press the button:

The actions performed above correspond to the execution of commands:
git commit
git push
Return to the GitHub website, open the repository and see if all the files have been uploaded correctly.
Web-based management, README file
Each repository should contain a README file. GitHub.com provides a simple online tool for easy editing. To add a README file, log in via your browser and click on it:

Fill in the README file with content containing the name of the repository, the author, the tools used, etc. In README files it is possible to use simple tags to format text of the Markdown type.
Add the file to the repository by “commiting” it:

Changes made on the remote repository can be immediately downloaded to the local repository. To do this, select the Fetch option in GitHub Desktop to download information about the current state of the remote repository:

and then:

The execution of these operations corresponds to the execution of the
commands git fetch and git merge. The
README file should already be visible in our project
folder.
Sending further changes to the remote repository is just as easy. Open the project in the Qt Creator environment and modify the program to draw three cubes. Return to GitHub Desktop and send the changes by adding a new commit (and describing the changes) and push the changes (push) to the server.
On the GitHub page in the Commits tab of your repository you can see the changes made to each commit, restore the previous version and much more. Review them yourself.
Like other social networking sites, GitHub enables communication between users. Find your friend’s profile and start observing it (follow). Search for interesting projects and mark them as watched (watch/star).
Collaboration on projects
One of the most important features of guitar is the possibility of cooperation of many authors in one project. Return to your new hello-git-name repository on GitHub.com and in the Settings/Collaborators tab add a profile of your colleagues sitting next to you. From now on, the selected user has the option to modify your repository.
Merge into a group of two with the next colleague and add your profiles to each other’s repositories.
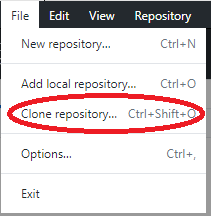
To start working on changing another user’s project, you need to
clone his project (git clone). To do this, return
to GitHub Desktop and select Clone repository from the
menu:

Then find the co-author’s repository and click:

Open the cloned project in the development environment and change the direction of rotation of the cubes.
In GitHub Desktop, select the changed local repository and add a new commit and send it to the server.
Download the changes made by your colleague to your repository.
Remember to log out of GitHub Desktop after your labs are finished! To do so, select File → Options… and then click Sign Out in the Accounts tab.
It is also useful to remove local repositories from your computer’s hard drive and GitHub Desktop. To do this, select the appropriate repository and select Remove from the Repository menu.
You can also delete a repository created during the lab to avoid cluttering your GitHub profile (Settings → Options → Danger Zone → Delete this repository).
Git using command line (Ubuntu)
It is both possible and recommended to use Git via the command line. This section explains the commands for creating a repository on a local machine, adding files, tracking changes, and pushing those changes to the server. Please note that most of the commands should work on Windows; however, they have not been tested. You can search the internet for the equivalent commands for Windows.
Create a local project
Use the mkdir command to create a new directory for your
project with the preferred name and navigate to the newly created folder
using cd:
mkdir my_project
cd my_project
To validate the existence of the my_project folder, navigate to the directory where the project was created using Files.
At this stage, you can add files to your project using three methods:
- By using the
echocommand to directly write text into a new file, as shown below:
echo "Some cool c++ code" > cool.txtTo validate the existence of the cool.txt file, navigate
to the directory where the project was created using Files.
- by using the
touchcommand to create a file in the working directory,as shown below:
touch way_cooler.txtTo validate the existence of the way_cooler.txt file,
navigate to the directory where the project was created using Files.
To open editor in terminal we can use nano using the command below:
nano way_cooler.txtStart typing your sample text. To save the file, press
Ctrl+O and then Enter. To exit, press Ctrl+X.
To validate the existence of the text in way_cooler.txt,
navigate to the directory where the project was created using the file
manager, and double-click on the file. You should see the text you
entered through the terminal.
- By copying file to your working directory from other places.
Setup local Git (version control)
make sure Git is installed using
git --versionin case git was not found can be installed using the commands below:
sudo apt update
sudo apt install git
To initialize Git in your working directory, ensure that you are
located in the project directory my_project in the terminal
and use the below comamnd.
git initIn order to track changes to your files in Git, those files must be added to Git (once). Files can be added one by one or all files at once, to add a single file to git use:
git add way_cooler.txtand to add all the files in your working directory to git execute:
git add .Next, we need to commit the changes to the Git history using the
command below. Please note that the -m parameter is
necessary to create a record of what has been changed or modified since
the previous commit of the working code. For instance, our first commit
will be called Initial commit. In subsequent commits, we
use descriptive phrases such as Some function added or
Readme file uploaded, etc.
git commit -m "Initial commit"It is possible to check the state and commit histroy of the local git using the command below:
git status
git log
Connect to Remote Repository (GitHub, GitLab, etc.)
Open GitHub in your browser and create a new repository with the name
of your project, my_project. If you don’t have a GitHub
account, this is the perfect time to create one.
After creating the repository, validate the existence of the remote repository by visiting the link below.
https://github.com/your-username/my_project.git
Please remember to replace your-username with your
actual GitHub username.
To connect the remote repository to your local project, use the command below in the terminal while in your project directory:
git remote add origin https://github.com/your-username/my_project.gitVerify the remote connection using the command below:
git remote -vIn Git, multiple copies of your project can exist thanks to branches. Each branch can maintain its own version of the project, allowing for different development paths and parallel feature development.
Check the current project branch
git branch --show-currentRename branch to main (if not already)
git branch -M mainNow it’s time to push our commits to the remote server,
git push -u origin mainTo validate, open the repository in your browser and check if your local files are present in your GitHub repository. In the future, to sync our local changes with GitHub, we need to use the commit and push commands consecutively.
Changing branches
To create a new branch execute
git checkout -b new-featureSwitch back to main branch
git checkout mainMerge the branches
git merge new-featureDelete the temporary branch
git branch -d new-feature🛠🔥 Assignment CLI 🔥🛠
Create a C++ project using Qt Creator, navigate to the project
directory where the project files are located, initialize Git, add the
files to Git, and commit the changes. Next, create a GitHub repository
with the same name as your project and connect your GitHub repository to
the Qt project. Use the command line to create a new branch called
development, switch to the development branch,
and create a README.md file if it doesn’t already exist. Add some text
to the project README.md in Qt Creator, then use the command line to
commit and push the changes to your GitHub repository. Finally, merge
the development branch into the main branch so that your
changes are included in the main branch. Validate the
existence of both branches using the “Branches” tab on GitHub, and check
the commit history to ensure everything is recorded correctly.
Final assignments 🔥🛠
- Read the tutorial to the GitHub: https://guides.github.com/. Read and understand topics up to and including Be Social.
- What is the .git folder and what does it contain?
- What is the .gitignore file and what does it contain? Modify the .gitignore file so that changes in the .pro.user files are not tracked. Using GitHub.com, remove the previously added .pro.user file from the repository.
- Sometimes when working together on a single file, there may be a conflict. Why? In this case, the merge operation is executed. Find out what a merge is, how to use it and how to deal with it!
- Think about what files might be in the repository? Is it appropriate to upload .exe or .bin files? Is it possible to upload a project packed with .zip to the repository? Why is the answer to the above questions in the negative? Which project/software environment definition files should be included in the repository?
Authors: Michał Fularz, Tomasz Mańkowski, Jakub Tomczyński